064: Jumper Joy! Sewing Autumn's Essential Layers
- sewmuchmorefun

- Sep 2, 2023
- 19 min read
with your host, Jacqui Blakemore
Finding Jumper Patterns
In the UK, the weather's changing, and we're in that transition period, so at times like this, autumn or spring, my mind turns to jumpers. And whilst a jumper seems like a fairly straightforward garment, it can be tricky to find just the right pattern.
So in this article I wanted to share with you some of the ones that I've tried, some that I would make again, and some that I probably wouldn't.
So if you are ready to get you cosy on then read on.
Jumper Pattern Inspiration

As the weather gets cooler here in the UK (not that it actually got that warm this year) I find myself reaching for clothes with slightly longer sleeves and I know that over the next few weeks I'm definitely going to be looking out for cosy and stylish jumpers to wear.
I'm still on the lookout for a good oversized sweatshirt pattern that makes me look like those stylish people that I see on Pinterest and not like the pumpkins that will shortly be making their appearance ready for Halloween, but as yet, that pattern still eludes me.
But the good news is that you don't have to get cold this winter as I do have a couple of jumper patterns that I've fallen in love with and will definitely make again.
I also want to talk to you about some others that I've tried that weren't completely successful but that have led me to fruitful pattern hacks.
And as always, I have a little gift for you. So if you're on the lookout for jumper pattern inspiration, I've put together 20 pattern ideas for you.
They each have different features and I've included the size ranges and the links to the patterns.
Why make a jumper or sweatshirt?
Now you may be thinking, I'm not a sweatshirt kind of girl, and I get that.
I'm definitely more likely to err on the side of overdressing for every occasion, but there are two things that have drawn me to making jumpers and sweatshirts.

The first is that as fashion evolves, jumpers and sweatshirts are no longer just considered something to throw on as you come out of the gym or keep you warm as you're doing the gardening. There are increasing numbers of luxury brands encouraging the creation of higher quality fabrics to elevate the humble jumper and sweatshirt to be worn for going out as well as staying in.
The second thing that's encouraged me to make more jumpers is that there are some lovely design features on some of the jumper patterns that add an element of chic.
So you'll notice in the pattern ideas that I've put in the download, they all have great features that you can incorporate on their own or even hack together.
So the patterns I'm going to talk to you about fall into the jumper category rather than the traditional sweatshirt category. And it's mainly because I've chosen styles that have a more fitted or raglan sleeve option because that suits me a little bit more.
But there are definitely sweatshirt options in the list that I've put together for you too so that you have a choice.
Sheridan Sweater - Hey June Handmade
So the first jumper I want to talk about is my most recent make and that's the Sheridan Sweater from Hey June Handmade. It's described as
"the perfect fall and winter layering piece to keep you cosy and warm but looking put together and stylish,"
which is exactly how I want to look in the autumn.
Sheridan features

It has two views that include
two neck options,
three length options, and
three sleeve options.
You can have a crew neck with a typical neckband or a funnel neck.
There is a cropped length which goes to about the high hip level as it includes a band at the bottom. There's a longer length which is the one that I made and that goes to about your sort of crotch level when the band's added on. But one of the views also shows it with no band which makes it a little bit shorter.
You can make the sleeve with a 3 inch cuff with just elastic to make more of a bishop sleeve shape or with no cuff and no elastic just as an open sleeve.
On the pattern pictures, it shows that version with the funnel neck in a grey and white spotted fabric. It looks really chic and it completely changes the look of the jumper. So I do like that the options are simple, but create different silhouettes.
Sheridan sizing
In terms of size range, it goes from a size 31 inches high bust and high hip, to a 46 inch high bust and high hip. I'm not really sure why this pattern uses high bust rather than full bust and I think it uses high hip because that is where the banded section is designed to sit.

In case you aren't sure, I think the general convention is that your hip measurement is taken around nine inches down from your natural waist and your high hip measurement is at around six to seven inches down from your natural waist. So it's in between the waist and the full hip measurement.
The high bust is the measurement around your back, under your arms and above your bust, so kind of across the chest as opposed to round the fullest part of your boobs.
The pattern allows for about four inches of ease at the bust and seven inches at the hip. But if you put the hip band on the bottom, that pulls it into your hip measurement.
My high bust measurement is around 35 and a half inches, so I chose the size 12 at the bust.
And my high hip is at 39 inches, so I went for a size 14 at the hip. But I did make some alterations here, which I'll mention in a moment.
Sheridan fabrics
This pattern recommends mid weight knits, ideally with some structure. And it says 60% stretch, but I don't think you need anywhere near that. And I think they might have got the decimal point in the wrong place.

It suggests sweater knits, french terry, interlock, ribbing and double knits. And the fabrics that are 56 inches wide or 140 centimeters, you'll need between 1.75-2 yards, which is 1. 6 meters to about 1. 85 meters, depending on the size that you want to make. It increases from a 38 inch bust upwards.
For the funnel neck, it recommends tricot fusible interfacing, which I think is also known as fusible knit interfacing. And for that you'll need half a yard. And if you're doing the elasticated sleeve, you'll also need 18 inches of half inch elastic.
I chose the Rico Fleece Back Sweatshirt fabric from Minerva, which on their website says that it's a stretch fabric with 10% stretch. But I'm not quite sure who they got to stretch it because the one I have doesn't seem to stretch at all.
Just as an aside on this point, my mum had a saying when I was growing up and starting to get a bit cheeky. If I challenged her about something that she was asking me to do, she would say
"Do as I say, not as I do."
And this is a classic example of why I tell you to buy swatches and not buy fabrics that seem too good to be true. I didn't buy a swatch and I fell for the 20% off the already discounted price of the fabric.
I do love the sweatshirt I've made. And as a wearable toile, because this was the first time I had tried this pattern, it's definitely good value.
But, it isn't the fabric I thought it was going to be, and if I'd ordered a swatch, I'm pretty sure I wouldn't have ordered the fabric. So please, learn from my mistakes. Anyway, lecture over.
Sheridan skill level and instructions
So this pattern is a PDF pattern. I don't think there's a pre printed version, but it comes with an A0 version that you can send to pattern printers if you don't want to print it out at home.

I printed it at home with my trusty little Epson printer, and then stuck it together. I know some people don't like doing that, but I have to say, it's one of my favourite parts of a new project. Does that make me a bit odd?
Anyway, the pattern has 9 pieces in total, but you only need 5 of them to make each view. A front, a back, a sleeve, and then an optional cuff, bottom band, facings for the funnel neck, and facings for the funnel neck. So I think it's a really quick make.
The simplest option, I think, is probably the funnel neck, open sleeve, and open bottom. So if you're a beginner, with this type of pattern, then I think that's a good one to have a go at.
It can be sewn on your sewing machine with a zig zag stitch to allow a bit of stretch, or on your overlocker if you have one.
I made the longer bodice with the cuffed sleeve and the neckband. I tend to sew this type of pattern on my sewing machine, particularly the first few times I make it, as it's easier to unpick if I need to make changes.
And then I finish the seams on my overlocker. But most knits don't really fray so you could just leave them.
The pattern pieces include 3/8 inch or 1cm seam allowance. This is less than you might find on a woven pattern because I think they're designed with sewing directly on the overlocker in mind.
The pattern includes instructions on how to lengthen and shorten the pattern pieces and how to do a full bust adjustment. It tells you which pages to print for each view so that you don't have to print them all if you don't want to. And it has nine pages of step-by-step instructions with images. And there's also instructions on how to join their Facebook group if you have questions.
It says that it's for a confident beginner, and I think that's probably because it uses stretch fabric. I think attaching the neck band and the hip band also needs a bit of practice as you do have to ease them into fit.
But if you know how to set the zigzag stitch on your sewing machine and how to put in a jersey needle, then I think you'll be totally fine with this pattern.
Sheridan adjustments
I did have to make a few adjustments to the pattern. As I mentioned, I blended between the sizes from the bust to the hip to give me more room.
Because the fabric didn't stretch either, I increased the hip band pattern piece by one and three quarter inches, to give me an additional 7 inches in total all the way round so that it wasn't too fitted. If I had made it in more of a stretchy fabric, I probably would have still increased the hip a little bit, maybe to add 3.5 inches in total, but then I am a lot bigger in that area.
As you might have seen on my Instagram, I thought I was going to have to get some rib knit for the neckband and cuffs, as there's no stretch in my fabric. But in the end, I cut the neckband on the bias, which gave me a little bit of play to manoeuvre with.
I made the cuffs 8 inches wide instead of the tapered ones that are in the pattern.
Other than that, I didn't really make any adjustments to it. I'd normally think about making a rounded back adjustment, but because it's designed to be a little bit more blouson with that band at the bottom, I didn't really need that. Although I think if I was using a bit more of a drapey sweatshirt or French terry, then I think I might make that adjustment next time.
There's not a lot of ease in this pattern and it has a fitted sleeve rather than a dropped shoulder, which is one of the reasons why I chose it. So it isn't meant to be slouchy and I think that does make it a little bit more of a dressy option. The sleeves are easy to insert, and I do like the placing of the fullness.
I think that I'll get a lot of wear out of it, and I'll definitely make another one possibly with the funnel neck and the elasticated sleeve, like the one that's shown on the front of the pattern.
Sheridan value for money
I bought the pattern direct from the designer's website, and at the time of writing that was $10.
I think that's really good value and it has detailed instructions and lots of wearable options. I also like that the blog post for the pattern has examples of each of the different options made up with different fabrics so that you can get inspiration.
So I think it's a reliable pattern, easy to follow, with good options and variations, and a quick make.
Billie Sweatshirt & Dress - Tilly and the Buttons
So the next jumper pattern that I want to talk about is the one that I made before the Sheridan sweater. And that is the Billie jumper from Tilly and the Buttons. This one had been on my list for a while because I was really drawn to the shape of the sleeves and the silhouette of the jumper.

The description of the pattern is that it's
"an ultra comfy sweatshirt or sweater dress that you can whip up in an afternoon. Dress Billie up or down for a meeting, dinner date or Sunday on the sofa. It's a relaxed shape, not too baggy. It has a classic crew neckline, a choice of timeless straight sleeves or dramatic balloon sleeves with deep cuffs."
The top version sits on the high hip, and the mini dress version with a cutaway pocket finishes 10cm above the knee. And there is a picture on the website of a navy blue version with the balloon sleeve that I really liked.
So as the description suggests, it has a jumper and a dress version. I haven't tried the dress version so I'm not going to talk about that, I'm just going to talk about the jumper.
Billie features
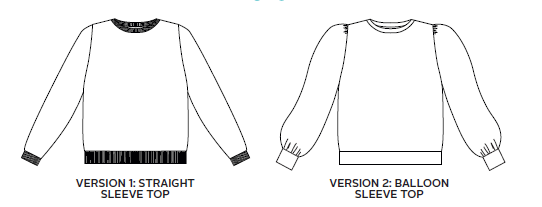
The jumper has a crew neck and two sleeve options. The balloon sleeve, which is fitted to the shoulder, has a lot of gathers to create fullness. And then it's also gathered at the cuff at the bottom. This version is shown with a band at the hip.
There's also a straight sleeve option, which is shown with a rib knit at the cuff and rib for the bottom band at the hip.
Billie Sizing
In terms of the size range, it goes from a size 30 inches at the bust and 33 inches at the hip up to a size 60 inches at the bust and 61 inches at the hip. So it is a bigger size range than the Sheridan.
The finished garment allows for around 4 inches of ease at the bust and 3 inches at the hip, although, that's then pulled in to the bottom band. That's not a huge amout of ease, so it is designed to be reasonably close fitting.
When I made it my bust measurement was 36 inches so I chose the size 4 at the bust and my hip was 41 inches so I went for a size 5 through the waist and the hip.
Billie fabrics
The pattern recommends sweatshirt fleece, french terry, ponte, double knit, interlock or sweater knits with at least 10% stretch. It has a note that you'll need a sturdy sewing machine to sew the balloon sleeve if you choose a thick sweatshirt fabric.

This is because you gather the sleeve into the cuff so there's a lot of layers to sew through.
For fabrics that are 56 inches or 140 centimeters wide you'll need again between one and three quarter yards up to three yards in this case because it goes to a larger size range. And that's 1.5 meters up to 2.6 meters, So depending on the size that you choose then the most that you're going to need for the straight sleeve version is 2.6 meters.
You'll need to add on around quarter of a yard or 0.3 meters if you want to go with the balloon sleeve option.
For more details on the sizing and fabric requirements click here: Billie sweatshirt & dress
The pattern recommends that if you're sewing with very stretchy sweater knits then to stabilize the shoulders with clear elastic or stay tape.
If you want to use ribbing for the cuffs and the bottom band, then it needs to be at least 27.5 inches or 70cm wide and you'll need 3/4 yard or 0.7 meters of it.
I used a burnt orange ponte fabric that I'd had in my stash for a while. It has a good weight and some stretch but a little bit of structure.
Billie skill level and instructions
The pattern is available as a PDF and also a printed version. Tilly's printed patterns come with very detailed booklets of instructions which are very colourful and ideal particularly for beginners as they have lots of photos.

The patterns are also printed on quite heavy paper so if you like to trace off your patterns then they won't disintegrate as you move them around or work with them.
You get the colourful step by step instructions in the PDF pattern too, and an A0 version if you don't want to print it at home.
Unlike most of the other patterns for the stretch garments, Tilly includes a standard 5/8 inch or 1.5cm seam allowance in these pattern pieces. So that's just something to be aware of when you're making it up.
She offers free tutorials for the techniques related to the pattern, which are a mix of blog posts and videos.
The pattern again is described as being suitable for confident beginners. And I think the same reasons apply as we've already talked about.
One thing to look out for, that I think can seem a little confusing in the instructions, is that because the pattern includes the dress option, there are instruction sections that just relate to the dress part. So you do need to read through and check the headings for each section to see if it applies to the version that you're making.
There is some gathering to do which involves sewing three rows of long stitches side by side and then pulling one end of the threads to gather the fabric. This is done at the top and bottom of the sleeve for the balloon sleeve option.
The instructions are good though and so if you haven't done that before you'll easily be able to follow those in the steps provided. I would usually only sew two rows for any gathering stitches, but I think she recommends that to get a nicer, even gather.
Like the Sheridan jumper, even though the sleeve is fitted, you sew it while the garment is laying flat, so that makes it easier to assemble.
Billie adjustments

When I made this first version I really wanted to love it, but sadly, I really didn't love the style on me.
I'm not sure if the ponte fabric I chose was a bit too structured, but the balloon sleeve at the shoulder looked huge and I was really conscious of them, and so I knew that if I left them like that I wasn't going to wear the jumper.
I also found that the fit wasn't very good at the back. The back armhole seemed to be too short for my body shape and it was pulling the jumper up under the arm.
But I really liked the fit around the neck, the waist and the hip. So I ended up taking quite a bit of the top section apart and adding in a yoke piece to the upper back to make the armhole longer by about one and a half inches.
I decided to change the sleeve. So I unpicked it and used the sleeve from the pattern that I'm going to tell you about next.
I just wanted to say at this point though, I was so looking forward to making this jumper and I was absolutely gutted when it didn't turn out very well. So I put it aside for a few days while I thought about what I could do to resolve it. It was quite a bit of work to unpick it, but I did most of it in front of the TV.
Fortunately, the sleeves had enough fabric in them that I could recut them, and I had just enough fabric to cut out the new yoke. So it was definitely more work, but honestly, it's now one of my favourite jumpers, and I do feel great when I'm wearing it.
So the lesson is, if it doesn't turn out quite right first time, that's okay. You've learnt from the process, and now you can get creative with options for making changes. I've since used my pattern hack again to make another jumper, I'm sure that I won't be the last.
Billie value for money
I bought the PDF version of this pattern, which at the time of writing is £13 from the Tilly and the Buttons website. The printed version is £17. 50 and I think you'd have to pay postage on top of that. But you can also get Tilly's patterns in a lot of sewing and fabric shops too.
To sum this one up, the balloon sleeve wasn't for me.
And I did have some fitting issues in the back armhole, but I think the sizing covers a wide range and there are a few options in the pattern, but personally I can't really see me wearing this as a dress.
So I didn't find this to be quite as good value as the Sheridan, but my hacked pattern is one that I will make again. And I wouldn't have created that without trying the Billie Sweatshirt.
Busan Top - Itch to Stitch
So the next pattern I want to talk about is the one that I made before the Billie Sweatshirt that I used in my Billie Pattern Hack. And that's the Busan Jumper by Itch to Stitch. It was the sleeves again that drew me to this pattern.

The pattern is described as
"providing a unique twist to your everyday comfort wear. The Busan top has statement sleeves with exaggerated narrow shoulders. Regardless of whether you have wide or narrow shoulders, the silhouette is designed to look great on you. Use jersey fabric to make it as a t-shirt or sweater knit fabric to make it as a sweater. You'll love this top either way."
Busan features
The design features statement sleeves with four lovely shoulder pleats that give it an elegant fullness without it being too poofy or gathered. The fullness only goes down to just below the elbow where it meets a long cuff that comes up almost all the way up your forearm.
It's designed to have exaggerated narrow shoulders based on the way that the sleeves are added. So it has the opposite effect of a drop shoulder, more traditional sweatshirt.
It has a crew neck with a neckband, and is just hemmed at the bottom with the finished length being just above the crotch level.
Busan Sizing
This has a similar size range to the Sheridan, going from a 31 inch to 46 inch bust, which is equivalent to a 33 to 48 inch hip. The finished garment includes just over 2 inches of ease at the bust and about 2 1 2 inches at the hip, so it is designed to be quite close fitting.
So if you prefer more ease then I'd recommend sizing up to get the same fit as the other two patterns.
When I made it my bust measurement was 36 inches but I didn't want it to be too fitted, so I chose the size 8 at the bust, which is the next size up. And my hip was 41 so I went for the size 10 at the hip. I did that on the front pattern, but because I'm bigger through the back hip, I blended to a size 12 on the back hip.
Busan fabrics

This pattern recommends medium weight knit fabric with 25 50% stretch. And if you want to do the elongated cuffs, I think you definitely need some stretch. It suggests that jersey, sweater knits and double knits are great choices.
And it also recommends fusible stay tape for any shoulder seams.
For fabrics that are 56 inches wide or 140cm, you'll need between 1 ¾ and 2 yards. So similar to the Sheridan. That's 1.6 to 1.7 meters, depending on the size that you want to make.
I used a teal coloured ponte fabric that had also been in my stash for a while. It has a good weight and some stretch and again a little bit of structure.
Busan skill level and instructions
This pattern is available as a PDF pattern and the skill level is specified as beginner plus. There are only 5 pattern pieces. The front and back bodice, a neckband, a large sleeve and then the sleeve cuff.
The pattern has instructions on how to lengthen and shorten the pattern pieces and also how to blend between sizes if you should need that, as I often do. It can be sewn on your sewing machine or on your overlocker. The pattern pieces include a 3/8 inch or 1cm seam allowance.
The pattern also includes three pages of detailed written and picture instructions which are really easy to follow.
Even though the sleeve has pleats, they're really easy to do and the sleeve is attached to the bodice on the flat which makes it simple to sew.
Because this doesn't have a bottom band like the other patterns, I used my overlocker to finish the bottom edge and then turned up the hem and sewed it in place with a twin needle. But you could also just use a narrow zigzag stitch or something similar.
Busan adjustments

In addition to blending between the different sizes, I did make a few other adjustments to the pattern. I did do a rounded back adjustment of 5/8 inch, but I didn't add the dart, I just eased the extra fabric in at the neckband.
When I made my Billie Busan hack version, I also shortened the long cuff so it made the sleeves 3/4 length rather than full length.
Busan value for money
I bought the PDF version of this pattern, which at the time of writing is $10. Unlike the other patterns there are no design variations included in this particular pattern but I still think it's good value as the fit's generally really good.
I do really love the options of the sleeve pleat and the narrowed shoulder as I think it's a bit different and for me with wider hips at the bottom it helps draw more attention to my smiley face!
I probably wouldn't make this in a thick fleece back sweatshirt, as I don't think the sleeve pleats would work very well. But it would look lovely in a French terry or a lighter weight sweatshirt, and I'd really like to make my hacked version in a sweater knit.
Just one more - Toaster Sweater, Sew House Seven

So they are my three recent jumper pattern experiences and I hope that you found that helpful.
I would say that one of the original jumpers I made was the popular Sew House 7 Toaster Sweater and I do have two of those from the version 1 design on that pattern.
I particularly like that version 1 has a raglan sleeve, but the stand up collar doesn't always stand up, and so I think I'd change that if I was going to make it again. It is in the download list so do take a look for yourself.
I'd just like to give a shout out to to Jo, also known as @fatthighsandmermaidpants on Instagram and Mel Keane for replying to my post on Instagram about jumper patterns. I've included their suggestions in the list so thank you so much for sharing those with me.
Have you made/will you make one?
I think jumpers are a great make as they're quick and I would say relatively easy. You can make them in fabrics that have some stretch but also have some structure. So if you're new to sewing with stretch fabrics they are a good introduction. They don't have many pieces and you can dress them up or down.
So if you do give them a try or if you have made any of these patterns yourself I'd love to hear your thoughts and comments. So please do get in touch.
And remember to download the list of pattern options for the ideas and inspiration.
To listen to the podcast version of this topic click on your favourite podcast app below:
And if you would like more help with any of the aspects mentioned in this article or this podcast episode then I would love to hear from you so do please email me at hello@sewmuchmorefun.co.uk.
Thanks for taking the time to read this article and I hope you find some useful tips that you can apply.
Sharing is caring - reviews
If you found this article helpful then please click the heart icon below to let me know and I'll create more content like this. And you can also use the icons in the footer if you want to share this with other sewing friends.
If you enjoy this podcast episode please be sure to share it and to leave a review in your favourite podcast app to help others find us.
Get in touch
I always love to hear about you trying out what you pick up from these articles and episodes so do let me know:
by email to hello@sewmuchmorefun.co.uk
by DM on Instagram @sewmuchmorefun.co.uk
on the Sew Much More Fun Facebook Group
Thank you so much for listening and for all your support. x
* this post contains affiliate links. This means if you use these links to buy something I may earn a small commission at no extra cost to you. I only recommend products I would/do use myself and all opinions expressed are my own. Read full privacy policy for more information.


Comments